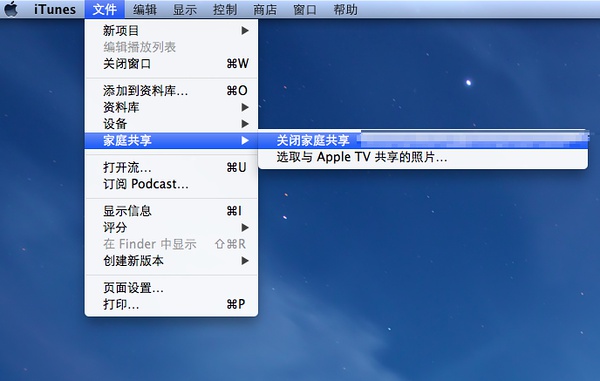
Discourse是一个“下一代,为下个十年互联网所打造的百分百开源讨论平台。”,由问答网站Stackoverflow和StackExchange的联合创始人,同时也是著名博客Coding Horror的博主 Jeff Atwood创造。
在实际使用中,Discourse需要和本地现有的用户系统整合。目前Discourse并没有提供解决方案。
我们通过oauth2的plugin,搭建oauth2服务器实现了Discourse和用户系统的整合,并将整合代码开源。
本文由云计算组长朱劲寿贡献。
1.0 系统环境:
uname -a
Linux dev2 3.5.0-23-generic #35~precise1-Ubuntu SMP Fri Jan 25 17:13:26 UTC 2013 x86_64 x86_64 x86_64 GNU/Linux
1.1 使用非root账号登陆(安全起见,不建议使用root),如果没有,自行创建。
sudo adduser bistu sudo adduser bistu sudo
1.2 更新linux
sudo apt-get update && sudo apt-get -y upgrade
1.3 安装 Discourse 所需的包文件
sudo tasksel install openssh-server
sudo tasksel install mail-server
sudo tasksel install postgresql-server
安装邮件服务的时候,选择“Satellite system” 或者“Internet Site” ,读者自己决定 ,然后在下一步输入你自己的域名,我用的是d.iflab.org
继续安装其它所需的包文件:
sudo apt-get -y install build-essential libssl-dev libyaml-dev git libtool libxslt-dev libxml2-dev redis-server libpq-dev gawk curl pngcrush
果你希望用 linux 本身发送邮件,则需安装 sendmail(具体设置方法请自行查阅):
sudo apt-get install sendmail
1.4 设定主机名称修改hosts:
bistu@Discourse:~$ cat /etc/hostname
Discourse
cat /etc/hosts
127.0.0.1	localhost Discourse
222.249.250.91	Discourse  d.bistu.edu.cn d.iflab.org
1.5 安装最新版的 Nginx
更新软件源:
cat <<'EOF' | sudo tee -a /etc/apt/sources.list

deb https://nginx.org/packages/ubuntu/ precise nginx
deb-src https://nginx.org/packages/ubuntu/ precise nginx
EOF
加入 nginx 密钥:
curl https://nginx.org/keys/nginx_signing.key | sudo apt-key add -
安装nginx :
sudo apt-get update && sudo apt-get -y install nginx
1.6 安装RVM
\curl -s -S -L https://get.rvm.io | sudo bash -s stable
sudo adduser $USER rvm
newgrp rvm
. /etc/profile.d/rvm.sh
rvm requirements
1.7安装 Ruby 2.0 和打包程序
rvm install 2.0.0
gem install bundler
2.安装Discourse
2.1 创建discourse用户,专门用于安装 discourse 论坛。
sudo adduser --shell /bin/bash discourse
sudo adduser discourse rvm
为用户 discourse 赋予操作数据库的权限:
sudo -u postgres createuser -s discourse
sudo -u postgres psql -c "alter user discourse password 'your password';"
新建www目录并赋予discourse权限
sudo mkdir /var/www
sudo chown discourse.discourse /var/www
切换到 discourse 用户:
sudo su - discourse
2.2下载并安装 discourse 源码
cd /var/www
git clone git://github.com/discourse/discourse.git
cd discourse
git checkout latest-release
bundle install --deployment --without test
最后这一步耗时较长,请耐心等待,大家可以更换ruby的源。安装完毕后,就可以开始配置 discourse 了。
2.3 修改 Discourse 的相关配置文件
cd discourse/config
cp database.yml.production-sample database.yml
cp redis.yml.sample redis.yml
cp discourse.pill.sample discourse.pill
cp environments/production.rb.sample environments/production.rb
2.3.1 修改 database.yml
nano database.yml
需要修改的内容包括:
用户名
密码
主机名
实际上,你还可以修改数据库的名称,不过这里不建议新手修改。 本文修改后的 database.yml 如下,请结合你的实际情况加以修改:
production:
  adapter: postgresql
  database: discourse_prod
  username: discourse   # if using username/password auth
  password: [你自己设定的密码]   # if using username/password auth
  # host: dbhost                # if not localhost
  pool: 5       # size of DB connection pool *per process*
  timeout: 5000
  # db_id: 0    # database ID if hosting multiple sites
  host_names:
    - d.iflab.org  # Update this to be the domain of your production site

test:
  adapter: postgresql
  database: discourse_test
  # username: discourse_test
  # password: 123123123123
  min_messages: warning
  host: localhost
  pool: 5
  timeout: 5000
  host_names:
    - test.localhost
2.3.2 修改 discourse.pill
nano discourse.pill
需要修改的内容包括:
将 rails_root 设为 /var/www/discourse
删除# Running bluepill as a user? Use:这一行下面那行的注释符号
本文修改后的 discourse.pill 如下,请结合你的实际情况加以修改:
rails_env   = ENV['RAILS_ENV']  || "production"
rails_root  = ENV['RAILS_ROOT'] || "/var/www/discourse"

user = ENV["DISCOURSE_USER"] || ENV['USER'] || 'discourse'
group = ENV["DISCOURSE_GROUP"] || ENV['GROUP'] || 'www-data'
num_webs = ENV["NUM_WEBS"].to_i > 0 ? ENV["NUM_WEBS"].to_i : 4

# to debug use
#Bluepill.application("your_app", :foreground => true) do |app|

# Running bluepill as a user? Use:
Bluepill.application("discourse", :base_dir => ENV["HOME"] + '/.bluepill') do |app|

# Running bluepill as root? Use:
#Bluepill.application("discourse") do |app|

  # getting this to work was a nightmare
  # bundle exec spawns a process totally messing with the demonize option
  # so we suck the environment out and set it up first
  bootup_bundle = [ "#{ENV['HOME']}/.rvm/bin/rvm/bootup_bundle",
                    "/usr/local/rvm/bin/rvm/bootup_bundle",
                    `which bootup_bundle`.strip,
                  ].each do |location|
    if File.exist? location
      break location
    end
  end
  # XXX if none match, bootup_bundle is set to the array

  if bootup_bundle
    app.environment = `env -i BUNDLE_GEMFILE=#{rails_root}/Gemfile #{bootup_bundle} exec env`.lines.inject({}) do |env_hash,l|
      kv = l.chomp.split('=',2)
      env_hash[kv[0]] = kv[1]
      env_hash
    end
  end

  app.environment ||= {}

  # Load .env file if there is one
  if File.exist? "#{rails_root}/.env"
    File.read("#{rails_root}/.env").split("\n").each do |l|
      kv = l.chomp.split('=',2)
      app.environment[kv[0]] = kv[1]
    end
  end

  # Force RAILS_ENV to the value specified in the environment of the bluepill invocation
  app.environment['RAILS_ENV'] = rails_env

  app.gid = group
  app.uid = user

  app.working_dir = rails_root
  sockdir = "#{rails_root}/tmp/sockets"
  File.directory? sockdir or FileUtils.mkdir_p sockdir
  num_webs.times do |i|
    app.process("thin-#{i}") do |process|
      process.start_command  = "bundle exec thin start -e production -t 0 --socket #{sockdir}/thin.#{i}.sock --pid #{rails_root}/tmp/pids/thin#{i}.pid --log #{rails_root}/log/thin-#{i}.log --daemonize"

      # Alternatively, you can start with a port number instead of a socket. If you do that, then you MUST update
      # the upstream section in the nginx config to match.
      # The nginx.sample.conf file assumes you're using sockets.
      # process.start_command  = "bundle exec thin start -e production -t 0 -p #{9040 + i} -P #{rails_root}/tmp/pids/thin#{i}.pid -d"

      process.pid_file = "#{rails_root}/tmp/pids/thin#{i}.pid"
      process.start_grace_time = 30.seconds
      process.stop_grace_time = 10.seconds
      process.restart_grace_time = 10.seconds
      process.group = "thins"
      process.uid = user
      process.gid = group
      process.daemonize = false
      process.stdout = process.stderr = "#{rails_root}/log/thin#{i}.log"
      # Thanks to: https://www.garrensmith.com/2012/09/24/Staying-up-with-Unicorn-Upstart-Bluepill.html
      # If the amount of memory is exceeded 3 times out of 5, restart
      process.checks :mem_usage, :every => 1.minutes, :below => 750.megabytes, :times => [3, 5]
    end
  end

#debug instance
#    app.process("thin-debug") do |process|
#      process.start_command  = "bundle exec thin start -e development -t 0 -p 10040 -P #{rails_root}/tmp/pids/thin-debug.pid -l #{rails_root}/log/thin-debug.log" -d"
#      process.pid_file = "#{rails_root}/tmp/pids/thin-debug.pid"
#      process.start_grace_time = 30.seconds
#      process.stop_grace_time = 10.seconds
#      process.restart_grace_time = 10.seconds
#      process.group = "thins"
#      process.uid = user
#      process.gid = group
#      process.daemonize = false
#      process.stdout = process.stderr = "#{rails_root}/log/thin-debug.log"
#    end

  app.process("sidekiq-worker") do |process|
    pidfile = "#{rails_root}/tmp/pids/sidekiq-worker.pid"

    process.start_command  = "/usr/bin/env PIDFILE=#{pidfile} RAILS_ENV=#{rails_env} bundle exec sidekiq -L #{rails_root}/log/sidekiq.log"
    process.pid_file = pidfile
    process.start_grace_time = 30.seconds
    process.stop_grace_time = 10.seconds
    process.restart_grace_time = 10.seconds
    process.uid = user
    process.gid = group
    process.daemonize = true
  end

end
2.3.3 修改 secret_token.rb 文件
为了保证站点的安全,需要生成密钥会话令牌。
cd /var/www/discourse
rake secret
将生成的密钥记下来,打开 config/initializers/secret_token.rb 文件
nano config/initializers/secret_token.rb
执行以下步骤:
清空该文件中的所有已有内容
将下面这行代码拷贝到该文件中,用刚才生成的密钥代替 [TOKEN] 部分
Discourse::Application.config.secret_token = "[TOKEN]"
2.3.4 修改 production.rb 文件,设定邮件发送方式
Discourse 中,系统邮件是非常重要的,它涉及到激活用户、修改邮箱、修改密码等多项功能。
如果你已经有了邮件服务器,则可以通过 smtp 服务发送系统邮件:
修改 config/environments/production.rb 文件:
nano config/environments/production.rb
修改其中有关邮件发送的部分,本文中如下:
  # you may use other configuration here for mail eg: sendgrid

  config.action_mailer.delivery_method = :smtp
  config.action_mailer.smtp_settings = {
    :address              => "yours",
    :port                 => 25,
    :domain               => 'd.iflab.org',
    :user_name            => 'iflab',
    :password             => 'yours',
    :authentication       => 'plain',
    :enable_starttls_auto => true  }

  if ENV.key?('SMTP_URL')
    config.action_mailer.smtp_settings = begin
      uri = URI.parse(ENV['SMTP_URL'])
      params = {
        :address              => uri.host,
        :port                 => uri.port,
        :domain               => (uri.path || "").split("/")[1],
        :user_name            => uri.user,
        :password             => uri.password,
        :authentication       => 'plain',
        :enable_starttls_auto => true
      }
      CGI.parse(uri.query || "").each {|k,v| params[k.to_sym] = v.first}
      params
    rescue
      raise "Invalid SMTP_URL"
    end
  else
    config.action_mailer.delivery_method = :sendmail
    config.action_mailer.sendmail_settings = {arguments: '-i'}
  end
2.4 初始化数据库:
cd /var/www/discourse
createdb discourse_prod
RUBY_GC_MALLOC_LIMIT=90000000 RAILS_ENV=production rake db:migrate
RUBY_GC_MALLOC_LIMIT=90000000 RAILS_ENV=production rake assets:precompile
2.5 配置服务环境
2.5.1 配置 Nginx
切换到 bistu 用户
sudo su - bistu
编辑 nginx.conf
sudo nano /etc/nginx/nginx.conf
在 http 部分加入下面一行:
server_names_hash_bucket_size 64;
如果该linux 上只有 discourse 一项服务,则禁用默认的 nginx 站点:
sudo mv /etc/nginx/conf.d/default.conf /etc/nginx/conf.d/default.conf.disabled
编辑 discourse.conf
sudo cp /var/www/discourse/config/nginx.sample.conf /etc/nginx/conf.d/discourse.conf
sudo nano /etc/nginx/conf.d/discourse.conf
将 server_name 改为你自己的主机名。
根据实际情况修改 socket 和 root 的路径,本文中如下:
upstream discourse {
  server unix:/var/www/discourse/tmp/sockets/thin.0.sock;
  server unix:/var/www/discourse/tmp/sockets/thin.1.sock;
  server unix:/var/www/discourse/tmp/sockets/thin.2.sock;
  server unix:/var/www/discourse/tmp/sockets/thin.3.sock;
}

server {

  listen 80;
  gzip on;
  gzip_min_length 1000;
  gzip_types application/json text/css application/x-javascript;

  server_name d.iflab.org;

  sendfile on;

  keepalive_timeout 65;

  location / {
    root /var/www/discourse/public;

    location ~ ^/t\/[0-9]+\/[0-9]+\/avatar {
      expires 1d;
      add_header Cache-Control public;
	      add_header ETag "";
    }

    location ~ ^/assets/ {
      expires 1y;
      add_header Cache-Control public;
      add_header ETag "";
      break;
    }

    proxy_set_header  X-Real-IP  $remote_addr;
    proxy_set_header  X-Forwarded-For $proxy_add_x_forwarded_for;
    proxy_set_header  X-Forwarded-Proto $scheme;
    proxy_set_header  Host $http_host;

    # If the file exists as a static file serve it directly without
    # running all the other rewite tests on it
    if (-f $request_filename) {
      break;
    }

    if (!-f $request_filename) {
      proxy_pass https://discourse;
	      break;
    }

  }

}
重启 nginx 服务:
sudo /etc/init.d/nginx reload
2.5.2 安装并配置 Bluepill
Discourse 官方使用 bluepill 来管理所有 discourse 的相关服务,省去了很多麻烦。
切换到 discourse 用户
sudo su - discourse
安装并配置 bluepill
gem install bluepill
echo 'alias bluepill="NOEXEC_DISABLE=1 bluepill --no-privileged -c ~/.bluepill"' >> ~/.bash_aliases
rvm wrapper $(rvm current) bootup bluepill
rvm wrapper $(rvm current) bootup bundle
注销并重新登录以激活 bluepill
logout
ssh discourse@localhost
到这里,discourse 就安装完成了,可以通过下面的命令行来启动:
RUBY_GC_MALLOC_LIMIT=90000000 RAILS_ROOT=/var/www/discourse RAILS_ENV=production NUM_WEBS=4 bluepill --no-privileged -c ~/.bluepill load /var/www/discourse/config/discourse.pill
为了让 discourse 每次开机就能自动运行,还需要在 crontab 里写入 bluepill 服务:
crontab -e
@reboot RUBY_GC_MALLOC_LIMIT=90000000 RAILS_ROOT=/var/www/discourse RAILS_ENV=production NUM_WEBS=4 /usr/local/rvm/bin/bootup_bluepill --no-privileged -c ~/.bluepill load /var/www/discourse/config/discourse.pill
2.6 创建管理员
登录你的 discourse 论坛地址,并注册一个用户,本文中注册的邮件地址为 [email protected]。
然后再次用 discourse 用户登录 linux,执行以下命令:
ssh [email protected]
cd /var/www/discourse
RAILS_ENV=production bundle exec rails c

me = User.find_by_username_or_email('[email protected]')
me.activate
me.admin = true
me.save
2.7 启用中文支持
目前,Discourse 已经可以支持中文界面,使用管理员账户登录后,点击右上角的管理员名称进入设置界面,然后再点击右上角的小扳手 Admin 进入系统管理界面,在第二项 Settings 中,把 default_locale 从默认的 en 更改为 zh_CN,然后返回论坛主界面,按 Ctrl+F5 刷新浏览器缓存,中文界面就出来了。
3 更新
鉴于 discourse 更新很快,建议每隔几天就执行一次更新。
用 discourse 用户登录 linux,执行以下命令:
ssh [email protected]
bluepill stop
cd /var/www/discourse
git checkout master
git pull
git fetch --tags
bundle install --without test --deployment
RUBY_GC_MALLOC_LIMIT=90000000 RAILS_ENV=production rake db:migrate
RUBY_GC_MALLOC_LIMIT=90000000 RAILS_ENV=production rake assets:precompile
bluepill start
如果启动失败并出现重试,则按 Ctrl+C 中止,然后执行以下两条命令重启 bluepill 服务:
bluepill quit
RUBY_GC_MALLOC_LIMIT=90000000 RAILS_ROOT=/var/www/discourse RAILS_ENV=production NUM_WEBS=4 /usr/local/rvm/bin/bootup_bluepill --no-privileged -c ~/.bluepill load /var/www/discourse/config/discourse.pill


 The old simple radii values for rounded corners are gone. Apple introduced a new shape, which got named “superellipse” by
 Apple developed a golden ratio grid system, which can be used to size and align elements on your icon correctly. Anyways, the grid template got criticized a lot by the design community, and it seems like designers (even Apple designers) are not following the grid system very strictly. Feel free to break rules if your icon looks better without taking care of the new grid system.
 While the size of the status bar is the same as in iOS6, the appearance of its content was slightly changed. You can control the background color to match the look of your app design or use the default color themes (white and black). In a lot of the default iOS 7 apps, the status bar is visually connected with the Navigation Bar without any separations.
 The Navigation Bar usually includes a title as well as basic navigation and action buttons (such as back to previous view, create, edit, etc.). In landscape orientation, the height of the Nav bar is usually shrunk a bit (to 32pt) to allow more content to be displayed below it.
 Tables (or lists) are using the full width of the display now and are not any longer surrounded by a container that separates tables from each other. The only visual separation between different table views are headlines which appear on top of the table (as known from previous iOS versions) on top of the main app background texture/color. Items within a table are separated by a simple 1px line, which has a margin of 15pt to the left side of the screens but connects directly with the right side of the screen. Each item has an inner padding of 15pt to both sides.
 Apple makes massive usage of icons without a fill color but only outlines with a thickness of 1pt, but “classic” icons with a color fill are still present and widely used in iOS 7. An often used style for active icons in the tab bar are inverted colors – while the inactive icon has often only outlines, the active one get‘s filled with a solid color while some strokes disappear or are inverted.